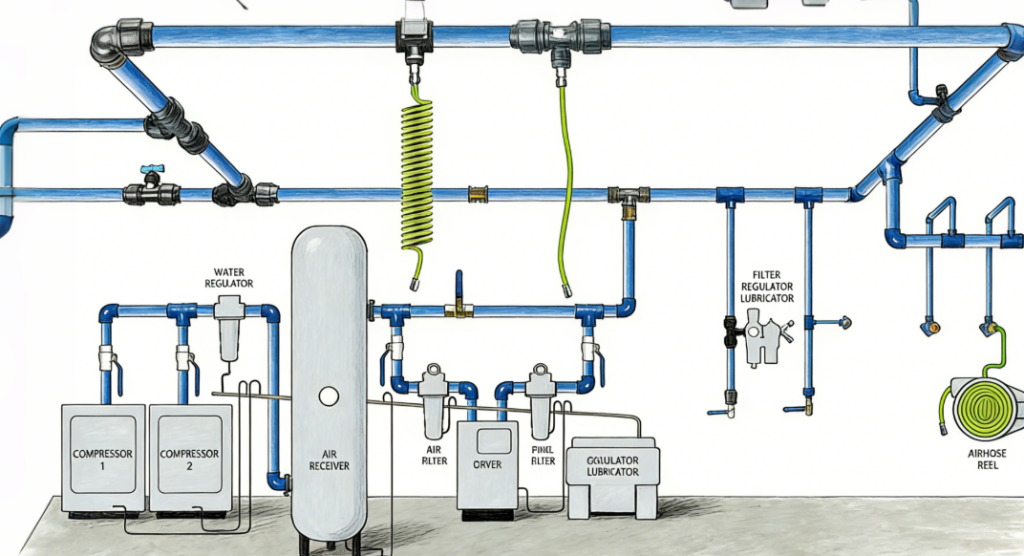
Your air compressor and dryer represent a major investment, but the piping system that delivers the air to your tools is often the weakest link. A poorly designed pipe network can create massive pressure drops, allow water to collect in your lines, and force your compressor to work harder—wasting thousands in unnecessary energy costs.
Many facilities suffer from “hidden” inefficiencies buried in their walls and ceilings. This guide exposes the most common and costly air piping mistakes and provides engineering-backed solutions to transform your compressed air system into a model of efficiency and reliability.
The Core Principle: It’s About Pressure Drop & Velocity
The goal of your piping is to deliver adequate pressure and clean, dry air to every point of use with minimal loss. The two key concepts are:
- Pressure Drop: The loss of pressure between the compressor and the tool. Every 2 psi of unnecessary pressure drop increases your energy consumption by about 1%.
- Air Velocity: The speed of the air inside the pipe. High velocity creates turbulence, friction, and carries water droplets instead of letting them fall out.
Mistake #1: Using Undersized Pipes (The #1 Energy Killer)
The Problem: Pipes that are too small in diameter force air to move at high velocity. This creates excessive friction, leading to large, constant pressure drops. Your compressor must then run at a higher discharge pressure to compensate, wasting energy. High velocity also prevents moisture from draining.
The Solution:
- Rule of Thumb: Size main headers for a velocity of 20 ft/sec (6 m/sec) or less.
- Quick Reference Table:
| System CFM Range | Minimum Main Header Pipe Size (Copper/Aluminum) |
| 0 – 50 CFM | 3/4″ |
| 50 – 100 CFM | 1″ |
| 100 – 200 CFM | 1-1/4″ to 1-1/2″ |
| 200 – 400 CFM | 2″ |
| 400 – 600 CFM | 2-1/2″ to 3″ |
- Always upsize for long runs (over 100 feet) or future expansion.
Mistake #2: No Slope or Drip Legs (Water in Your Lines)
The Problem: Horizontal pipes installed level or with sagging traps allow condensate to pool. This water travels downstream, damaging tools, ruining paint jobs, and causing corrosion. It also reduces the effective internal diameter of the pipe, increasing pressure drop.
The Solution:
- Slope All Pipes: Install pipes with a 1/4″ per 10 ft (2% slope) downward in the direction of airflow, toward a drain point.
- Install Drip Legs: At every natural low point and before every drop to a tool, install a T-fitting with a vertical drip leg (6-12 inches long) and an automatic drain valve at the bottom. This collects water before it can travel down the tool drop.
Mistake #3: The “Grid” vs. “Dead-End” Layout
The Problem: A “dead-end” main header (a single pipe that runs out and stops) is common but problematic. Air and water must travel the entire length to the last tool, maximizing pressure drop and water carryover.
The Solution:
- Install a Loop (Grid) System: Run the main pipe in a closed loop around your facility. Air can flow from both directions to any point of use, halving the travel distance, minimizing pressure drop, and balancing demand.
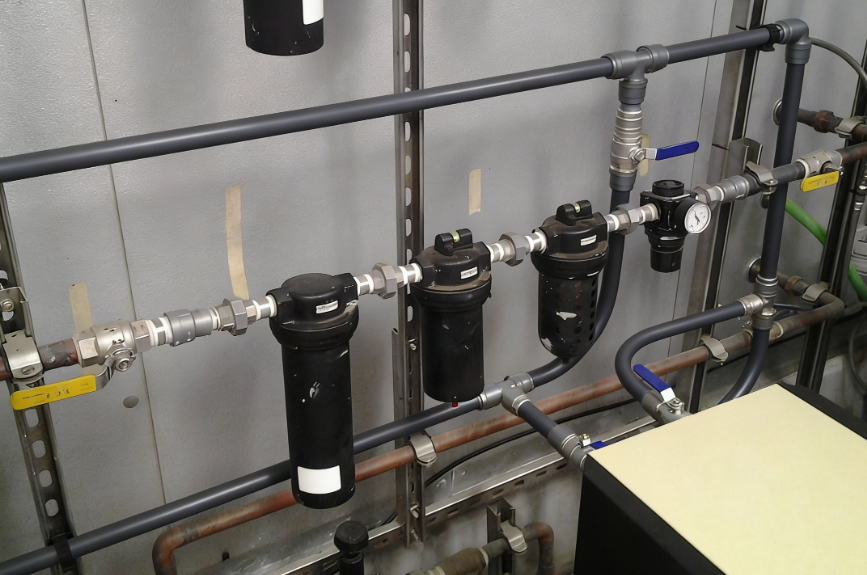
Mistake #4: Using the Wrong Pipe Material
The Problem:
- Galvanized Steel: Corrodes internally over time. Flaking rust clogs filters, tools, and valves, and increases friction.
- PVC or Plastic Pipe: Extremely dangerous. Can shatter from impact or air compressor lubricant, creating lethal shrapnel. It is also prohibited by most safety codes (e.g., OSHA).
- Black Iron: Prone to rapid internal rusting.
The Solution: Use modern, corrosion-resistant materials:
- Aluminum Piping (Recommended): Lightweight, easy to install, corrosion-free, and low friction. Available in modular, push-to-connect kits.
- Copper Type L: Excellent for smaller systems. Corrosion-resistant but more expensive and requires soldering.
- Stainless Steel: For extreme environments or food/pharma applications. High cost.
- Certified Compressed Air Plastics: Only use plastics specifically rated and labeled for compressed air systems if local codes permit.
Mistake #5: Improperly Sized or Missing Aftercoolers & Dryers
The Problem: Piping cannot solve a problem created upstream. If hot, saturated air from the compressor enters the pipes, it will cool inside the pipes, dumping massive amounts of liquid water into your system. No piping layout can overcome this.
The Solution: Ensure your aftercooler reduces the air temperature to within 10-20°F of the cooling water/air temperature, and your dryer is sized to achieve the required pressure dew point for your coldest ambient pipe run.
The Cost of These Mistakes: A Quick Calculation
Scenario: A 100 HP compressor producing 500 CFM.
- Mistake: Undersized piping and poor layout cause a 10 psi pressure drop.
- Extra Energy Cost: To compensate, the compressor discharge pressure is raised 10 psi.
- Annual Waste: ~5% of the compressor’s energy input, or roughly $2,500 – $4,000+ in wasted electricity (at $0.10/kWh, running 6,000 hours/year).
FAQ: Compressed Air Piping
Q1: How do I measure the pressure drop in my current system?
A1: Install pressure gauges at the compressor discharge (after dryers/filters) and at the farthest point of use. Run a tool that consumes significant air at that point. The difference between the two gauge readings while the tool is running is your system pressure drop. Aim for less than 10% of your compressor’s discharge pressure.
Q2: Should I use flexible hose for my main lines?
A2: No. Flexible hose has a small internal diameter and creates high pressure drop. Use it only for the final 3-6 foot connection to a moving or vibrating tool. Use rigid or semi-rigid piping (like aluminum) for all fixed runs.
Q3: How often should I drain my drip legs?
A3: Ideally, install automatic zero-loss drain valves on every drip leg. If using manual drains, they must be opened at least once per shift. In humid conditions or with high usage, more frequent draining is needed.
Q4: We’re expanding our shop. Can we just extend our old piping?
A4: First, audit your current system pressure drop and air velocity. If your existing pipes are already undersized, extending them will make the problem worse. It’s often better to install a new, correctly sized loop and tie the old system into it as a branch.
Conclusion: Good Piping is the Foundation of Efficiency
Your compressed air piping is the circulatory system of your shop. Investing in a correctly sized, sloped, looped system made of proper materials is not a construction cost—it’s an energy efficiency investment with a rapid payback.
Fixing these common mistakes reduces your compressor’s workload, cuts energy bills, improves tool performance, and dramatically increases the reliability of your entire operation by eliminating water and pressure problems at the source.
Ready to audit your piping system or design a new one? Contact the MINNUO engineering team. We can perform a system pressure drop analysis, recommend the optimal pipe sizing and layout for your facility, and provide all components for a high-efficiency compressed air distribution network.
 Email
Email sales:+86 15366749631