Summary: Air compressor oil leakage is a common but serious issue, typically indicating worn internal seals, failed oil seals, or structural cracks. According to the consensus among compressor maintenance experts, ignoring oil leaks can quickly lead to inadequate lubrication, component overheating, and catastrophic failure. This guide will immediately help you locate the most common leak points—including crankshaft seals, head gaskets, sight glasses, and drain valves—and provide a clear resolution path from simple tightening to professional repair, ensuring your compressor returns to safe and efficient operation.
Act Now to Avoid Costly Consequences
When you discover oil stains beneath your air compressor, this is never a minor issue to overlook. The core cause of compressor oil leakage is the compromised integrity of the lubrication system’s seals. Whether it’s a reciprocating piston or rotary screw compressor, lubricating oil is its lifeline. Continuous leakage not only causes waste and environmental contamination but also directly leads to rapid wear of critical components like bearings, piston rings, and rotors due to insufficient lubrication, ultimately resulting in costly complete failure. This guide aims to help you quickly diagnose the root cause, understand its urgency, and take the correct corrective actions.
Diagnosing the Leak Source: From Most Common to Most Hidden
Quickly locating the source of the leak is the first step to solving the problem. Follow this inspection process, which typically covers 90% of leakage cases.
Primary Leak Point Checklist
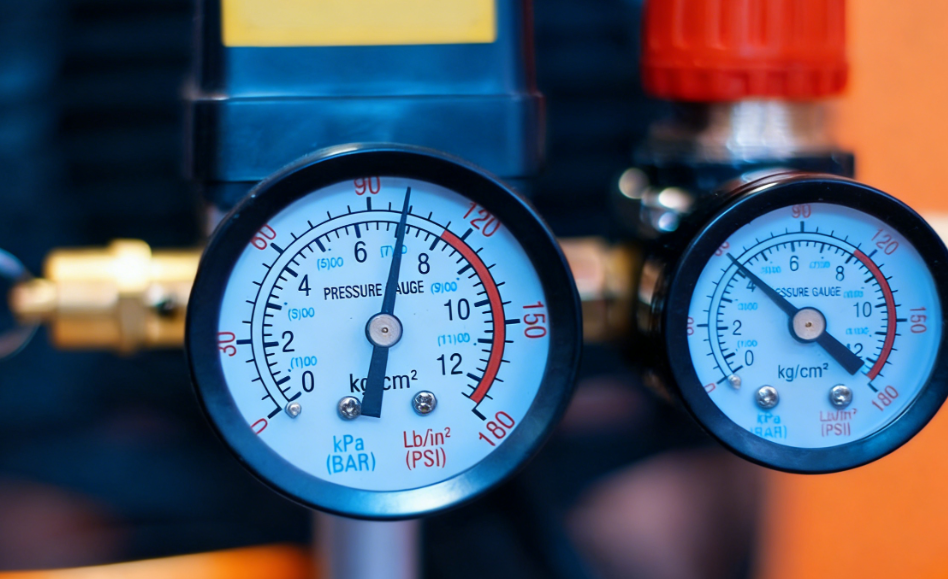
- Oil Sight Glass / Level Gauge: Check if the seal (O-ring) around the glass or plastic window is aged and cracked, or if the window itself is cracked.
- Drain Valve / Fill Port: Ensure the drain plug and fill cap are tightened and their gaskets are intact.
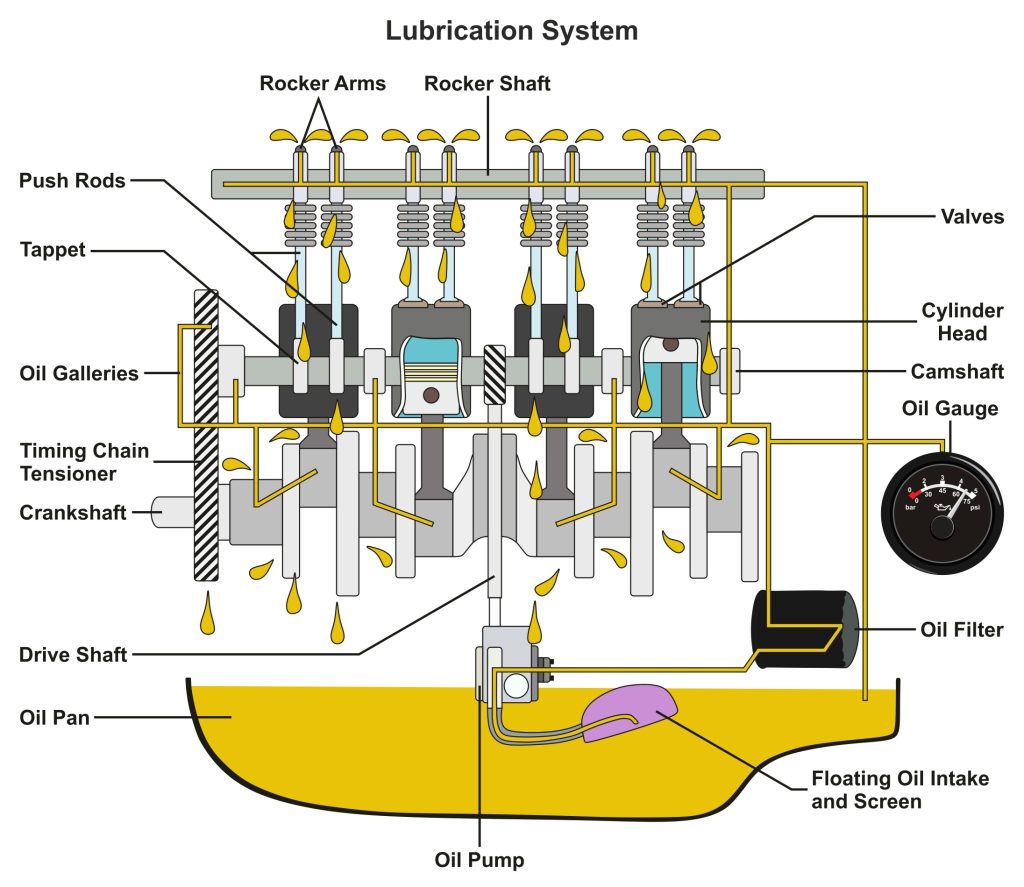
- Crankshaft Seal (Shaft Seal): This is the most common leak point for reciprocating compressors. Check where the crankshaft exits the crankcase. If oil is seeping out radially, the shaft seal is usually worn.
- Cylinder Head & Valve Plate Gaskets: Inspect the joint between the cylinder head and the crankcase. If the gasket is blown, a mixture of oil and compressed air may leak from here.
- Breather Valve / Vent Cap: If clogged, it causes excessive internal pressure in the crankcase, forcing oil out through other weak seals.
- Oil Line Fittings & Hoses: Check all oil hose connections and oil filter seals for looseness or cracks.
- Crankcase/Cylinder Cracks: After extreme overheating or physical impact, cracks may appear in the crankcase or cylinder, which constitutes serious structural damage.
Quick Reference Table: Leak Location vs. Probable Cause
| Leak Location | Probable Cause | Severity Level |
| Crankshaft End | Worn or aged crankshaft oil seal | High – Requires immediate replacement |
| Cylinder Head Seam | Blown or deteriorated head gasket | Medium-High – Affects pressure & lubrication |
| Around Sight Glass | Hardened seal or cracked glass | Low – Easy to fix, but address promptly |
| Bottom Drain Valve | Loose plug or missing washer | Low – Usually just tightening or washer replacement |
| Multiple Seep Points | Clogged breather, overfilled oil, or incorrect oil type | Medium – Requires systematic check |
Step-by-Step Troubleshooting and Repair Guide
Once the leak point is identified, refer to the following steps for repair.
Safety First: Always disconnect power, release ALL air pressure from the tank, and drain the compressor oil before any operation.
Step 1: Simple Fixes (User-Performable)
- Clean and Tighten: Thoroughly clean the compressor housing, especially suspected leak areas. Then re-tighten all visible bolts, plugs, and pipe fittings. Run for a few minutes and check again; sometimes looseness is the only cause.
- Replace Sight Glass Seal: Purchase the correct size O-ring seal, remove the sight glass, clean the groove, install the new seal, and tighten evenly.
- Check and Clean Breather Valve: Locate the breather valve (usually on top of the crankcase), remove it, clean it with solvent to remove grease, and ensure it vents freely.
Step 2: Intermediate Repairs (Requires Some Technical Skill)
- Replace Drain/Fill Port Washer: Use the correct wrench to replace damaged fiber or rubber washers.
- Replace Oil Filter: If leaking is around the oil filter center, the filter may be loose or the sealing surface dirty. Replace with a new filter, hand-tighten, then give a slight additional turn with a tool (refer to manual specifications to avoid over-tightening).
- Correct Oil Level and Type: Ensure the oil level is at the midpoint of the sight glass. Always use the specified viscosity grade and type of compressor-specific oil as required by official manuals from major manufacturers like Ingersoll Rand and Quincy. Incorrect oil can cause foaming and seal deterioration.
Step 3: Professional-Level Repairs (Recommended for Technicians)
- Replace Crankshaft Seal: Requires removing the pulley or coupling, using special tools to extract the old seal and press in the new one. This operation demands high concentricity; improper installation will accelerate new seal wear.
- Replace Head/Valve Plate Gasket: Requires disassembling the cylinder head, cleaning all old gasket material, ensuring mating surfaces are perfectly flat and clean, then tightening head bolts in a diagonal sequence to the specified torque.
- Repair Crankcase Crack: For small cracks in metal casings, professional welding is sometimes possible, but this is often costly and requires evaluation of worth.
Frequently Asked Questions (FAQ)
My compressor only has a slight seep. Can I keep using it?
Absolutely not recommended. Even a slight seep indicates a defect in the sealing system. Continued operation will accelerate the leak and may allow dust and moisture into the internals, causing more severe wear and corrosion. Schedule inspection and repair as soon as possible.
Should I use sealant or stop-leak additives to plug the leak?
Strongly discouraged. According to the practical experience of veteran compressor engineers, these additives may temporarily plug tiny gaps but are more likely to clog oil passages, contaminate the oil, and damage internal precision components (like thermostatic valves). They cannot repair physically damaged seals, are a temporary fix with high risk.
How can I prevent future oil leaks?
Following a preventive maintenance schedule is key:
- Regular Inspection: Visually check for oil stains weekly.
- Use Genuine Consumables: Always use manufacturer-recommended lubricants, filters, and seals.
- Avoid Overheating: Keep coolers clean and ensure the compressor operates in a well-ventilated area.
- Proper Operation: Follow start/stop procedures and avoid frequent heavy load starts.
Why is lubricant blowing out of the discharge air line?
This is usually not “leakage” but “oil carryover” failure. Possible causes include:
- Oil level too high.
- Failed oil return check valve or separator element.
- Compressor running long-term at low pressure.
This needs to be diagnosed separately from external leaks and typically involves the air-oil separation system.
How much oil should I add after repair? How to check?
After repair, initially add oil to just above the minimum line on the sight glass. Start the compressor and run it unloaded for a few minutes to circulate oil and fill the new filter and lines. Shut down, wait several minutes for the oil level to stabilize, then top up to the centerline (or between MAX and MIN) of the sight glass. Never exceed the maximum fill line.
Conclusion and Your Next Steps
Air compressor oil leakage is a clear maintenance signal. Through systematic diagnosis—from simple sight glass and valve checks to complex shaft seal and gasket assessments—you can accurately identify the problem. For simple tightening and gasket replacements, users can attempt the repair themselves; but for disassembly involving core components (like crankshaft seals, head gaskets), entrusting the job to a certified professional technician is often the more economical and safer choice.
Your Next Steps:
- Immediate Action: Disconnect power, perform a preliminary visual and cleaning inspection to confirm the main leak point(s).
- Assess Capability: Judge whether the repair is within your skill level based on this guide.
- Make a Decision: If it’s a simple issue, purchase genuine parts and repair. If it involves core components, contact an authorized compressor service provider immediately for professional diagnosis and repair.
- Establish Prevention Habits: After repair, incorporate regular checks of oil level and seal condition into your routine maintenance checklist.
Source Statement
This article was written by a Senior Mechanical Engineer with over 10 years of experience in industrial equipment maintenance. The information is based on the latest industry standards from the “Compressed Air and Gas Handbook”, technical specifications from Ingersoll Rand and Atlas Copco official service manuals, and the author’s professional insights gained from maintaining hundreds of reciprocating and rotary screw compressors. The content is intended to provide accurate general guidance, but specific operations must always refer to the official user manual for your equipment and, when necessary, consult qualified professional technicians.

 Email
Email sales:+86 15366749631