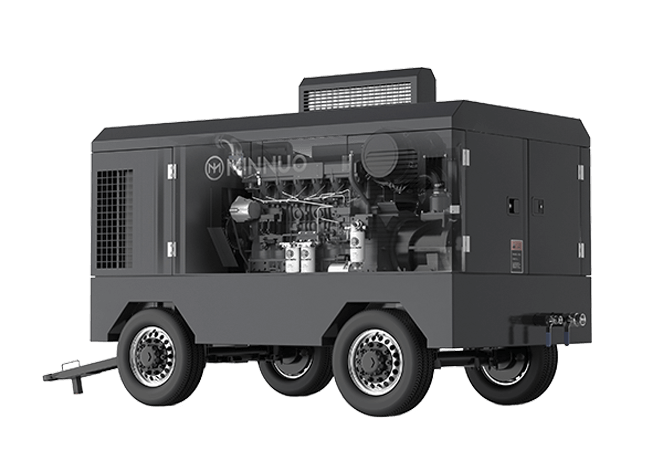
Installing a diesel mobile air compressor is a critical step that directly impacts the efficiency and safety of the equipment. Proper installation not only extends the lifespan of the compressor but also enhances work efficiency, ensuring the equipment operates reliably in harsh environments. This guide provides a detailed installation process and answers common questions to help you install your diesel mobile air compressor smoothly.
When installing a diesel mobile air compressor, first choose a solid and level surface with good ventilation and sufficient space. Ensure the equipment is placed level, connect the compressed air pipeline and fuel system properly, and inspect all components. Before starting, perform an inspection and adjustment of the equipment to ensure there are no leaks, and the engine runs smoothly. Regular maintenance is key to ensuring long-term, efficient operation of the equipment.
I. Crucial Preparations Before Installation
Site Selection and Environmental Assessment
- Solid, Level Ground: Choose a surface with strong load-bearing capacity and a solid, level base (concrete is ideal). Avoid soft, sloped, or unstable surfaces to prevent displacement or tipping of the equipment during operation.
- Adequate Ventilation: This is extremely important! The installation site must have good airflow to ensure the diesel engine burns fuel efficiently and exhaust gases (especially carbon monoxide) are effectively vented outside or to an open space. Never operate the equipment in confined spaces (such as small rooms or basements) or poorly ventilated areas.
- Space Requirements: Ensure enough space around the equipment (at least 1 meter) for daily operation, maintenance, cooling, and airflow. Consider the direction of the compressor’s intake and exhaust ports to avoid obstruction.
- Environmental Factors: Avoid extreme temperatures, high humidity, excessive dust, proximity to flammable or explosive materials (e.g., fuels, chemicals), and corrosive environments. Consider rain and sun protection needs (e.g., build a canopy if necessary).
- Noise Consideration: If the installation is in a noise-sensitive area, assess whether additional noise-reduction measures are required.
Safety Preparations
- Personal Protective Equipment (PPE): Installation personnel must wear a hard hat, safety glasses, steel-toe shoes, and oil-resistant gloves.
- Firefighting Equipment: Ensure that a fire extinguisher that meets standards (preferably dry powder or CO₂ type) is available at the site.
- Warning Signs: Place safety signs around the equipment, such as “No Smoking or Open Flames,” “Caution: High Temperature,” “Beware of Rotating Parts,” and “Noise Hazard.”
- Familiarize with the Manual: It’s essential to carefully read and understand the MINNUO Operation and Maintenance Manual, especially the sections on installation, safety, and warnings.
Equipment and Accessory Inspection
- Unboxing Inspection: Check the packing list to ensure the main unit, accessories (pipes, fittings, tools, etc.), and documentation are complete and undamaged.
- Appearance Check: Inspect the equipment for visible damage, dents, or oil leakage during transportation.
- Document Verification: Confirm that the operation manual, warranty card, and certificate of conformity are included.
II. Detailed Installation Steps
Transport and Positioning of the Equipment
- Safe Unloading: Use appropriate lifting equipment (e.g., forklift, crane), and strictly follow the lifting points marked on the equipment. If it’s a trailer type, carefully tow it to the designated position.
- Precise Positioning: Move the air compressor steadily to the chosen installation location. Ensure the equipment is level (using a level tool) and adjust with shims if necessary. For wheeled units, make sure the brakes (if available) are locked.
Securing the Equipment (for non-wheeled or long-term fixed positions)
If the equipment needs to be fixed permanently or to prevent movement, secure it with anchor bolts or dedicated brackets to the concrete foundation (according to the equipment’s base pre-drilled holes).
Connecting the Compressed Air Piping System
- Pipe Requirements: Use clean, dry pipes with a pressure rating that meets or exceeds the compressor’s rated discharge pressure (e.g., galvanized steel pipes, stainless steel pipes, or specialized high-pressure hoses). The pipe diameter should not be smaller than the compressor’s discharge port size.
- Connection Stepsa. Clean the exhaust port threads or flange face.b. Wrap the appropriate amount of sealing tape (PTFE tape) or apply specialized thread sealant (choose according to the interface type).c. Securely connect the piping joint or flange to the compressor’s exhaust port, tightening with an appropriate wrench—avoid over-tightening, which could cause damage.d. Connect the other end of the piping to your air network. Ensure the entire piping system is well-sealed with no leakage points.
- Key Attachments
- Oil-water separator / Storage tank: If required or included, install it on the pipeline following the exhaust port and ensure the drain valve is easily accessible.
- Safety Valve: Absolutely do not alter or block the safety valve! Ensure the safety valve is intact and its discharge port leads to a safe area.
Fuel System Filling and Inspection
- Fuel Selection: Use clean, high-quality diesel as per MINNUO manual specifications (typically national standard 0# or -10# diesel, depending on environmental temperature). Never use gasoline or other fuels!
- Filling Procedurea. Clean the fuel tank filler cap area.b. Use clean containers and funnels to add diesel, preventing impurities or moisture from entering the tank.c. Fill to the proper level (typically within the visible range of the oil gauge).
- Leak Check: After filling, carefully inspect the fuel tank, fuel lines, filter, and connections for any leaks.
Engine System Inspection
- Lubricating Oil (Engine Oil)
- Check the oil level in the engine sump (using the dipstick) to ensure it is within the recommended range. If insufficient, add new oil that meets the manual’s specified grade and viscosity (e.g., API CH-4, CI-4, SAE 15W-40, etc.).
- Coolant (for water-cooled models)
- Check the coolant level in the radiator or expansion tank, ensuring it is within the specified range. If necessary, add antifreeze coolant according to the required mix ratio.
- Air Filter: Inspect the filter element for cleanliness, integrity, and proper installation.
- Battery
- Ensure the battery terminals are tight and free from corrosion (if installing a new battery, connect the battery cables).
- Check the electrolyte level (if applicable).
- When connecting, always connect the positive terminal (+) first, then the negative terminal (-) to prevent short circuits or sparks.
Exhaust System Inspection
Ensure that the muffler and exhaust pipes are securely connected and free from damage. Emphasize that the exhaust pipe outlet must be directed to an open, well-ventilated outdoor area, away from doors, windows, and air intakes to prevent exhaust gas backflow.
III. Post-Installation Debugging and Initial Operation
Final Check
- Perform a comprehensive review of all connections (air, fuel, electrical), fasteners, and fluid levels.
- Clear any debris or tools from the work area to ensure safety.
Cold Machine Check (without starting the engine)
Manually rotate the crankshaft (as per the manual instructions) to feel for smooth movement without jamming.
Starting and Warm-up Check
- Follow the manual’s start-up steps (usually: turn on the fuel valve, power on, preheat if needed, and start the engine).
- Observe closely:
- After starting, let the engine idle for a few minutes (warm-up). Listen for any unusual noises (e.g., knocking, friction sounds).
- Monitor the exhaust color (normal should be light gray or smoke-free; continuous black, blue, or white smoke is abnormal).
- Check the dashboard: Ensure oil pressure builds up quickly and stays within normal range, the water temperature gradually rises to operating temperature, and the voltage is stable.
Load Operation and Performance Testing
- Gradually close the exhaust valve (or allow the system to gradually load) to bring the air compressor into load operation.
- Observe and record:
- Ensure the load operation sound is normal.
- Verify that the exhaust pressure reaches and stabilizes at the rated value.
- Ensure that exhaust temperatures (if monitored) remain within a safe range.
- Perform a final check for any leaks, especially under load.
Shut Down
- Follow the manual’s shutdown procedure (usually unload the compressor for a few minutes before turning off the engine). Close the fuel valve (if applicable).
IV. Daily Operation and Maintenance Tips
- Before Each Start: Perform a brief check (engine oil, coolant, fuel, air filter appearance, pipe connections, and leakage signs).
- During Operation: Regularly monitor instrument readings (oil pressure, water temperature, voltage, air pressure, exhaust temperature).
- After Shutdown: Perform daily maintenance as per the manual (e.g., drain the air tank / oil-water separator condensate).
- Strictly Follow the Manual: Conduct regular maintenance (e.g., change engine oil, filters, air filters, coolant).
V. Frequently Asked Questions (FAQ)
| Question | Answer |
| Q: Does the ground need to be perfectly level? | A: It is crucial! Installing on an incline can lead to uneven oil distribution, increasing internal engine wear and negatively affecting the compressor’s lifespan and stability. Always use a level tool to adjust to a horizontal state. |
| Q: Can I use regular car diesel fuel? | A: You can, but we strongly recommend using high-quality automotive diesel that meets national standards (e.g., National VI). Low-quality diesel contains more sulfur and impurities, leading to clogged injectors, poor combustion, carbon buildup, and engine damage. In cold regions, choose the appropriate grade (e.g., -10#, -20#). |
| Q: Can the MINNUO air compressor run in parallel? | A: Some high-power MINNUO models are designed for parallel operation, but this involves complex control systems (e.g., central control panel) and piping design. Never attempt simple parallel setups on your own! Contact MINNUO technical support for a professional solution if needed. |
| Q: How should I prepare the equipment for long-term storage? | A: The key is “empty and rust-proof”! ● Completely empty the fuel tank (run until the engine shuts off) or fill with high-quality diesel and add a stabilizer. ● Change the engine oil and filters (old oil contains acidic substances). ● Remove the battery and store it separately, charging periodically. ● Inject a small amount of rust-proof oil into the cylinders and rotate the engine a few times. ● Clean the equipment, store in a dry and ventilated area, and cover to protect from dust. Refer to the “Storage” section of the manual for more details. |
| Q: When should the engine oil be changed for the first time after installation? | A: The engine oil and oil filter must be changed after the first 50 hours of operation (or as per the manual). This is a crucial step to remove metal shavings during the break-in period, which is vital for engine longevity. Afterward, change oil as per the regular maintenance cycle. |
| Q: Can I install the compressor myself, or must I hire professionals? | A: If you have basic mechanical and electrical knowledge and safety awareness, and follow this guide and the manual, you can install and adjust the equipment yourself. However, for complex piping systems, electrical wiring, or if you encounter any questions, it is strongly recommended to contact MINNUO authorized service providers or professional technicians to ensure safety and optimal performance. |
VI. Conclusion
Choose MINNUO, choose reliable power! By following this detailed installation guide, your MINNUO diesel mobile air compressor will provide long-lasting, stable, and efficient compressed air power for various applications (construction, mining, oil fields, road work, industry, etc.). Proper installation is the foundation for successful operation.
If you encounter any installation or operational issues, feel free to contact MINNUO’s global customer support team! We offer professional technical guidance and after-sales service. Visit the MINNUO website for more product information and technical resources.

 Email
Email sales:+86 15366749631